So I decided to replace the loop-and hook Greenwich couplings with Steve’s Pepper7 Gnine dumb-buffers. I prefer the simplicity of these they reflect the ethos of the projects well. Plus I can steal the Greenwich’s for other projects…
Each wagon will receive some touching up and tlc before august, and some may even change altogether – for example the tank wagon at the back my be no more by the end of the week…
It’s being inspected by members of the NGRM forum to make sure I am heading in the right direction. Though quietly I’m rather pleased with progress so far.
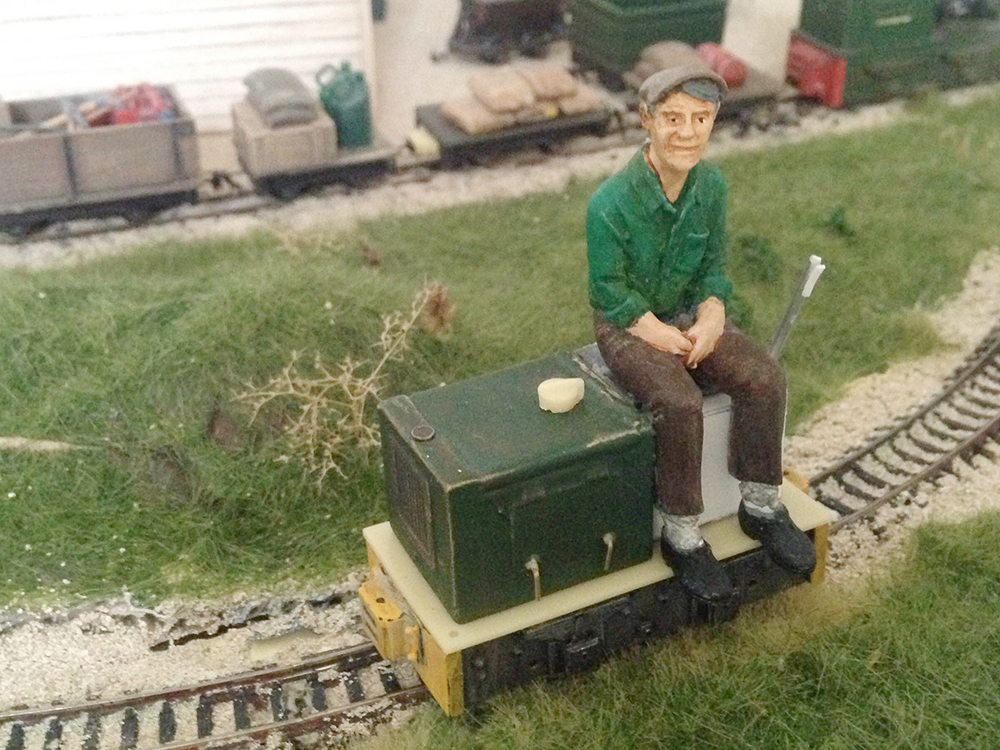
After looking at my bits box and thinking about what I could add to the little loco I dug out a footplate and fuel cap detail part. These minor additions give the model a little more weight and begin to remove the ‘O9’ appearance of the little beastie.
Eddie looks quite comfortable on the new little loco as it passes the shed
Once the parts were posed (nothing is glued) Eddie took the loco for a cruise around the layout, the Bachmann chassis recently had a clean and an oil, so it was pleasing to see the model glide seamlessly around the layout.
The footplate and fuel cap add some context, removing the loco’s O9 roots
All I need to do now is strip the bonnet then stick the bits together, I think a back plate would be a nice addition too, there is more than enough room from one – then consideration goes towards a simple roof, but until then the loco will look complete enough to appear in use at MOMING in August.
So last week I mentioned the raising scenery preventing trains from traveling the full layout circuit – well I have managed to rectify the problem with some chopping and digging.
This was the worst area, its always in the sun which is what may have cause the issue
Layers of ballast and sand were scraped away from the track – something that I needed to address ages ago anyway – and excess landforms were cut away with the intention of re-forming them once the dust has settled. The results? Trains running in circles and some more playtime, tidying can wait!
The amount of times I nearly cut that red wire…
Next project is to tidy up and get some paint slapped on the sand to disguise it as ballast and gravel/dirt. Just a couple more circuits with the work train…
Eddie was more comfortable on the bonnet than the slightly lower seat from Lester, so there needs to be changes made there
So the little loco has developed, albeit in a slightly different direction than I originally intended. Sitting Eddie on ‘Lesters’ seat and the little loco shows a rather stark difference to the Tiny, I have an old photo from where I originally sat the two together a few years ago, so it wasn’t a surprise, what is quite pleasing is that the little Mite doesn’t look out of place here – other 7.25” gauge locos vary in size in such a way.
The locos seem to sit well with each other despite the size difference
Going forward I am considering taking the loco down the same route as Simon Andrews’ example here. The characterful little beastie would suit the line rather well I think, but we will have to see how that goes, some recent running trials have revealed that some scenery has lifted at the edge of the track work, preventing stock from completing full circuits – so that’s next on the list of things to deal with.
Adding a little roof may help the new loco ‘fit in’ a little more with other Gnine stock
Poor Jon potentially stand to lose more of his legs, unless I can dig out the other figure I butchered last year
After faffing with Lester the other day, I managed to distract myself by digging out the Mite underframe I had in the spares box. The Gnine-a-mite met a gruesome fate when I began work on Lester – so I have a tiny bonnet sat in the spares box too for another project.
This photo should give an idea of how large Lester is/was compared to the current project
This new idea (currently in the sketching stage) follows the same design as Lester, but makes everything a little more ‘miniature’ rather than minimum gauge, maintaining consistency with the existing Tiny locomotive from Pepper 7. I think something a little smaller will have more charm and hopefully look more in place that Lester – not that he is going anywhere! All the components are still sat on my model shelf, I’m just good at adding to my work-load!
Jon peers over Lester’s roof…a sure sign that he needs to lose some height…
I do! He’s my little scratch-build loco that has sat on my shelf for the best part of a year waiting for me to sand, glue and stick together. This Bachmann brick underneath this model is still such a smooth runner, and has only had a light oil over the time I have had it, otherwise it simply glides around the layout with little to no bother at all.
Lester has a ‘minimum gauge’ quality to him that I love
A thought crossed my mind that I may try and fit the body to the existing Pepper7 underframe I have sat on a shelf, just to keep the loco in sync with other stock, at the moment it is a little over-gauge and longer than the Tiny, but then perhaps this give Lester his character? Would love a ‘Lister’ like plate on the grille, showing the word Lester instead…better get in touch with Narrow planet I guess….
This cruel close up shows warts and all, still early days – you can see where I experimented with underframe detail and pulled out last-minute!
Minor notes: Jon needs his bum shaving, as his head pokes OVER the cab, I need also to tidy the gaps that appear here and there and add detail to the under-frame. As this is a very early-days look at the model I can take this in a number of directions! So much choice!
After posing the buildings the other day, I thought it best to consider the purpose of the smaller shed. The larger is possibly some kind of storage area, maybe a small workshop for use by the railway, the smaller could be put to good use in another way.
Assuming the construction was stone or brick…perhaps with the addition of the log kiln from Little Kiln, this could be a charcoal storage shed? one thing is for sure, it needs to be a little larger. I will mess with the layout a little more before making any rash decisions, an alternative idea is to simply have the one shed on the layout, and use the smaller one on something else – replacing it with a vehicle or junk and bushes. Choices, choices!
Eddie poses next to the shed, behind which will be junk and maybe a fuel area
Once the paint on the study wall dried from the day before, I had the layout out on the work-surface ready to set-up the scene we wish to show when completed. Eddie decided to pose for photographs, once I was happy with how the buildings sat I took these shots to give an idea of how this layout will evolve, still more layers of ballast to add and bushes to get on, but things look a little more together already.
Bushes will hide a lot of what we can see here of Eddie, a view like this will be more difficult to get by August
I have to say for photos on an iPhone these don’t look too bad either! A major benefit to a light room with patio doors.
You can just make our the other little storage shed in the right corner of the scene here – I may have to drop the charcoal kiln on here and see how it looks
The above shot shows the potential this layout has – the key here is simplicity and not over-complicating or cluttering the scene.
After setting myself the challenge of increasing my modelling time, I found little joy in ‘forcing’ myself to get on and finish the grass. Instead I rather enjoyed plucking out scenic bits to depict weeds or small plants, and that has started to break up the uniform grass already, once bushes are added we’ll see a real change.
Breaking up the grass with weeds and small plants
Getting in close after cleaning up the track shows I need to go around the layout again with ballast and glue, hopefully I’ll have more luck disguising the n-gauge sleepers at the ends…I’m sure once painted they’ll be OK.
MOMING 15 is only 5 months away now…I better get a move on.